
This article will guide you through adding and editing badges, locking badges and using badge permissions. Badges are a fun addition to the Awards function and can be used with or without points as a great way to recognize and congratulate a team member for a big accomplishment, new certification, or reaching an important goal. Your account comes with a default library of Badges you can utilize, or you can add your own custom designs.
By default, Super Admins and Admins are able to send Awards. Limited Admin Privileges can be assigned to Users to allow them to send Awards and badges.
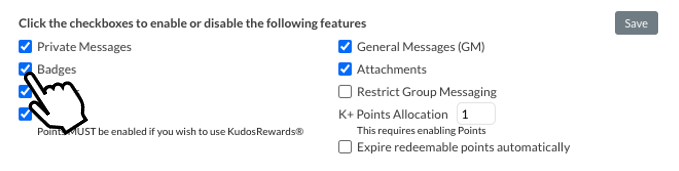
To ensure that Badges are turned on for your account, begin by navigating to Admin ⚙️ > Account Settings > Customize > Giving Recognition and enable Badges.
To view and add Custom Badges, navigate to Admin ⚙️ > Account Settings > Customize > Badges > Custom Badges. Your account comes with a default library of Badges that you can add or remove. You can decide which Badges you want to make available by clicking the checkboxes in front of the Badge title.
To add a Custom Badge, click Custom and then click + New Badge under Badge Library. Add a name and description for the Badge, and upload the file from your computer. Badges should be 100px wide by 100px high. Once you’ve uploaded your Badge and given it a name and description, click Save.
If your organization uses points, you can set a default amount of points associated with each Badge, and either lock the points amount or leave it editable for the sender to decide when giving out the Badge. You can also lock the points at zero if you want a specific badge to always be associated with no points. If points are not locked for a specific badge, the sender will be able to set the points amount to anything within their Points to Give allocation. When points are locked to a Badge, they cannot be changed when sending an Award. If the sender does not have enough points to give, the Award will be sent without points.
To edit the points associated with each badge or to enable/disable specific bages, navigate to the Admin Gear ⚙️ ![]() > Account Settings > Customize > Badges. Use the dropdown options to open No Badge, Default Badges or Custom Badges. Once you've selected a Badge section, you will see a full list of all badges.
> Account Settings > Customize > Badges. Use the dropdown options to open No Badge, Default Badges or Custom Badges. Once you've selected a Badge section, you will see a full list of all badges.
You can enter your chosen default points by typing a number into the text box and clicking Save. You can lock or unlock the points associated with a badge by clicking the lock icon.
Use the check-box beside each badge name to enable or disable the badge.
You can edit a specific badge by clicking the badge image within Admin Gear ⚙️ ![]() > Account Settings > Customize > Badges:
> Account Settings > Customize > Badges:
Once you've opened the Badge, you can edit the badge name, image, description, points, and badge permissions. Be sure to scroll to the bottom of the pop-up window to click Save when you’re done!
Badge permissions allow you to determine which users can or cannot send specific badges.
❗️Important Notes:
- Anyone that has Admin, Super Admin, or Users with Give Awards feature enabled will be able to send all badges, regardless of the badge permissions.
- If a User has "Give Awards" enabled and they are only supposed to be able to send specific badges, you must turn off Give Awards for that person prior to giving them permission on the specific custom badges.
- Selecting All Users will give all users in the organization permission to use this badge. Be sure to lock the points if you do not want users to be able to choose the number of points to send with the badge.
- Users will only see the Awards option when sending recognition messages if there are Custom Badges available for them to send. If a User does not have any badge permissions, they will not see the Awards option when sending recognition messages.
You can start assigning custom badge permissions by navigating to Admin Gear ⚙️ > Account Settings > Customize > Badges and click on a Custom Badge. Next, you can add the user, department, group, or location you'd like to give permission to. Be sure to scroll to the bottom of the pop-up window to click Save when you’re done!
We hope this helps! If you have any questions, please reach out to us at support@kudos.com and one of our friendly team members will be happy to assist you.
Comments
0 comments
Article is closed for comments.